IT&C 210 Labs are created and maintained in GitHub. When you accept the lab through GitHub Classroom you will get your own copy of the lab repo including the instructions folder. As you develop your lab solution you should commit and push frequently. Doing so will ensure that you don’t lose your progress if something bad happens.
Important! The first five points of your lab credit come from accepting the lab and making your first commit by end-of-day Friday before the lab is due. You must do all of these steps including committing at least one change by that time. When passing off your lab, the TAs will check your commit history in GitHub to verify that five-point credit.
If you are using your own computer to complete the lab assignments you must install Visual Studio Code and Git on your computer. Follow these instructions to install these essential tools.
As the semester progresses, you will need other tools such as Docker. Installation instructions for those tools are included in the relevant labs. If you are using a lab computer, the relevant tools are pre-installed.
Accept the Assignment
- Click on the
Accept this assignment through GitHublink on the Lab Assignment in LearningSuite. - Once the repo has been created for you, click on the assignment link. It will look something like this: https://github.com/BYU-ITC-210/lab-1b-yourgithubname
- Click on the
instructionsfolder to view the instructions for the lab.
Clone the Repository to Your Computer
You can clone the repo using the Command-Line Interface (CLI) or using the built-in Git support in VS Code. It’s valuable to learn both methods. The Git support in VS Code is convenient and only involves a click or two. The Git CLI has more options for handling complicated matters.

Option 1: Clone the Repo Using CLI
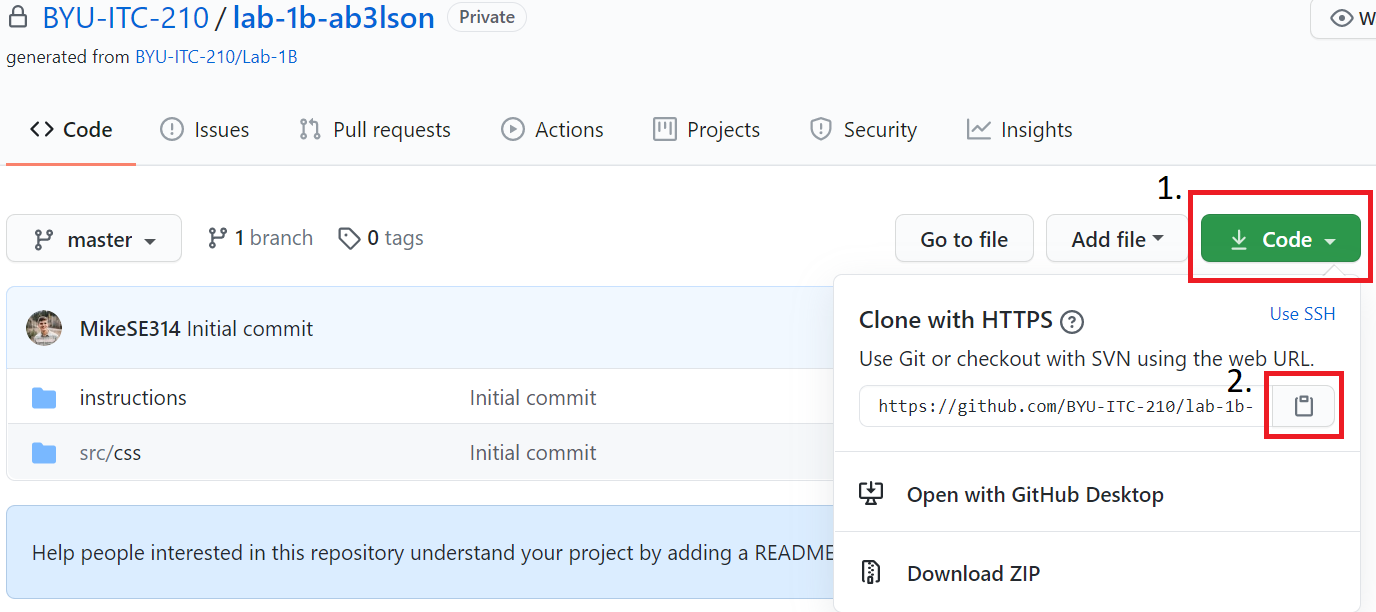
- On the GitHub repository page, click on the green “Code” button.
- Copy the repository link by clicking on the clipboard icon in the pop-up box.
- Open a command line (WSL2, Windows Command Line, Mac Terminal, etc.)
- Navigate to the parent folder of where you want this repo folder to appear (e.g.
source/ITC210). - Type
git cloneand paste the URL from step 2. For example:
git clone https://github.com/BYU-ITC-210/lab-1a-yourgithubname- If this is the first time you are using Git from this computer, you will be prompted to log into GitHub. Git should save your credentials and you won’t have to log in for future operations.
- Navigate to the cloned repo and start working!
- Tip: you can type
codefrom the CLI and VS Code will open the folder in which you are located.
- Tip: you can type
Option 2: Clone the Repository to Your Computer Using Visual Studio Code
- On the GitHub repository page, click on the green “Code” button.
- Copy the repository link by clicking on the clipboard icon in the pop-up box.
- Open VS Code
- If you have a folder open, close it.
- Select the Source Control icon
 on the left.
 - Click
Clone Repository. - Paste the URL you copied on step 2.
- Choose the parent folder of the folder where you want the repo to be located on your computer.
- Click
Select as Repository Destination- If this is the first time you are using Git from this computer, you will be prompted to log into GitHub. Git should save your credentials and you won’t have to log in for future operations.
Review the Lab Instructions
It’s best to view the lab instructions on GitHub.com in the instructions folder of your repo. Alternatively, you can access the instructions in the copy you have cloned to your computer. The instructions are in MarkDown format (something we will discuss in more detail shortly). The GitHub.com view will display them nicely. If you want to open the instructions in VS Code, use the MarkDown preview icon in the upper-right for a friendly view.
Make An Edit
- Make at least one change to your code. You could add a comment to source code, create a README.md file or (best of all) get started on the lab itself.
Commit and Push Your Changes
Commit and push your at least one change to GitHub before end-of-day Friday so that you earn the first five points on your lab assignment. You can do this from the command-line or within VS Code.
Option 1: Commit and Push With the CLI
- Open a terminal window in the folder where your repo is located.
- Type
git add *to stage all of your changes. - Type
git commit -m "commit message"but substitute a description of the changes for “commit message”.- If you forget the
-margument then Git will open your default editor for you to enter a message.
- If you forget the
- Type
git pushto push the commit to GitHub.
Option 2: Commit and Push with VS Code
- Open the repo folder in VS code (you have likely done so already).
- Select the Source Control icon
 on the left.
 - Enter a commit message in the box above the blue
Commitbutton. - Click the
Commitbutton.- If you forgot to enter a commit message, VS code will open a new window for you to enter the commit message. Enter the message there and click the checkbox in the upper-right corner.
- Click the
Sync Changesbutton that replaced theCommitbutton.
Get to Work
Follow the lab instructions to complete the lab. Take advantage of Lab Time after the class period to get tips, share with peers, and get TA help.
Remember: Commit early and commit often. Inevitably you will mess something up, a computer will crash, or something will go wrong. Whenever that happens you can just return to any prior commit point and continue where you left off. Your computer could completely crash and you just
git cloneon a lab computer to continue working. Git may seem awkward at first but someday it will save your bacon!